10 Common Roti-Making Mistakes and How to Avoid Them for Perfect Chapatis
Few culinary experiences match the comfort of a warm, perfectly puffed roti fresh from the tawa. This staple Indian bread, made from just flour, water, and heat, appears deceptively simple. Yet, many home cooks struggle with rotis that turn out hard, chewy, pale, or stubbornly flat. These issues often stem not from a lack of skill but from small, easily overlooked errors in the process. In this guide, we explore the ten most common roti-making mistakes and provide detailed solutions to ensure every batch yields soft, flexible, and beautifully cooked chapatis.
The Foundation: Moisture and Timing
At its core, great roti-making hinges on two critical elements: proper hydration in the dough and precise, confident cooking on a hot surface. When the dough is soft, well-rested, and the tawa is at the right temperature, the magical puffing happens almost effortlessly. Mastering these subtle details transforms roti-making from an unpredictable chore into a calm, rhythmic ritual. It becomes a seamless cycle of kneading, resting, rolling, and cooking, culminating in soft rounds of bread ready to soak up dal, sabzi, or a generous swipe of ghee.
Common Mistakes and How to Fix Them
- Using the Wrong Flour or Old Atta
Not all wheat flour performs the same way. Ideal roti flour is finely milled whole wheat with moderate protein content and a fresh, aromatic quality. Old atta, or flour stored for too long in warm kitchen environments, loses moisture and elasticity, resulting in dry, cracking rotis that lack softness.
—
How to avoid it: Purchase atta in quantities that you can finish within one to two months. Store it in an airtight container away from direct heat and sunlight. If the flour develops a stale smell or feels unusually coarse, it is time to replace it with a fresh batch.
- Adding Water All at Once
Pouring water quickly into the flour often creates uneven hydration, leading to sticky patches in some areas and dry flour in others. This makes kneading more difficult and can encourage excessive use of dry flour later in the process.
How to avoid it: Add water gradually while mixing with your fingers. Aim for a soft, slightly tacky dough consistency—neither too wet nor crumbly. Remember that different flours and seasonal humidity levels require varying amounts of water, so prioritize texture over strict measurements.
- Kneading Too Little or Too Aggressively
Under-kneaded dough lacks sufficient gluten development, causing rotis to crack and tear easily. Conversely, over-kneading, especially when combined with too much dry flour, can make the rotis tough and chewy.
How to avoid it: Knead the dough for approximately 6 to 8 minutes until it becomes smooth and elastic. Test by pressing your thumb into the dough; if it springs back slowly, it is ready. Use only a light dusting of flour if necessary to prevent sticking.
- Skipping the Resting Time
This is one of the most significant culprits behind stubborn, difficult-to-roll rotis. Resting allows the gluten to relax and moisture to distribute evenly throughout the dough. Without adequate rest, the dough remains tight, making rolling challenging and the final product less pliable.
How to avoid it: Cover the dough and let it rest for at least 20 to 30 minutes at room temperature. If you have more time available, a longer resting period can further enhance the texture and ease of handling.
- Making Uneven Dough Balls
Lumpy or cracked peda (dough balls) roll out unevenly, leading to inconsistent cooking where some parts cook faster than others, resulting in an imperfect roti.
How to avoid it: Pinch off smooth, equal-sized portions and roll them between your palms until they are round and free of cracks. Flatten each ball slightly before dipping it in dry flour to prepare for rolling.
- Using Too Much Dry Flour While Rolling
Excessive flour on the rolling surface prevents proper contact with the hot tawa, resulting in pale rotis that fail to puff. It can also burn on the pan, leaving bitter specks on the bread.

How to avoid it: Dust the surface lightly, using just enough flour to prevent sticking. Before cooking, gently brush off any extra flour from the rolled-out roti to ensure optimal heat transfer.
- Rolling Too Thick or Too Thin
Thick rotis tend to remain doughy and undercooked on the inside, while ultra-thin ones dry out quickly and become brittle.
How to avoid it: Aim for an even circle approximately 15 to 18 centimeters in diameter, thin enough to be flexible but not translucent. Rotate the dough after every few strokes of the rolling pin to maintain uniform thickness throughout.
- Cooking at the Wrong Temperature
A lukewarm tawa dries out rotis slowly, making them stiff and tough. Conversely, an overheated pan burns the surface before the inside has a chance to cook properly.
How to avoid it: Heat the tawa on medium-high until a drop of water sizzles instantly and evaporates. Maintain steady heat throughout the cooking process, adjusting as needed based on the roti's behavior.
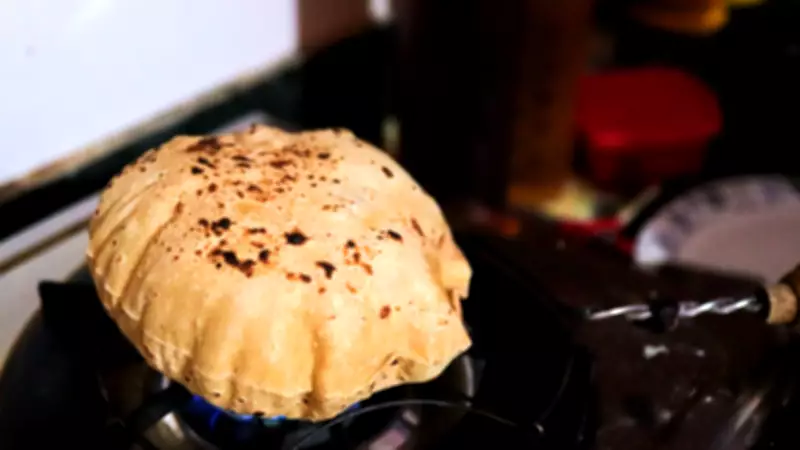
- Flipping Too Often or Too Late
Constant flipping disrupts the steam buildup necessary for puffing, while waiting too long to flip can cause the roti to become hard and overcooked.
How to avoid it: Allow the first side to cook until bubbles form and light brown spots appear, then flip. Cook the second side briefly, pressing gently with a cloth or spatula to encourage puffing. Flip once more if needed for even cooking.
- Leaving Rotis Uncovered After Cooking
Even perfectly cooked rotis lose their softness and become dry if left exposed to air after removal from the tawa.
How to avoid it: Stack cooked rotis in a cloth-lined container or a casserole with a lid. The trapped steam helps keep them pliable and soft until serving time.
By addressing these common pitfalls, you can elevate your roti-making skills and consistently produce soft, fluffy chapatis that complement any meal. Remember, patience and attention to detail are key—each step, from selecting fresh flour to proper resting and cooking, contributes to the final result. Embrace the process as a mindful culinary practice, and enjoy the satisfaction of serving perfect rotis every time.